Showing posts with label board game. Show all posts
Showing posts with label board game. Show all posts
Sunday, April 7, 2013
Seega boards now available on EBay!
Finally got around to listing some of our boardgames on EBay. Right now we're going with Seega boards to see how things go. Two styles are listed: one with the raised fence frame, and one with the flush frame. Very excited about this big step. Eventually we may set up our own online storefront.
Sunday, January 22, 2012
Seega Game process
Hello, everyone--figured it was time to get back into updating the blog regularly--apologies for the overlong delay.
Any of you that have read the older posts know that I like to write not only about the games we make, but the stages and processes we use to make them. This entry focuses mainly on a small batch of Seega games we've nearly completed, but the process itself applies (mostly) to how we assemble our tafl boards as well. There are basically three components to these game boards as we makes them: the base, the game squares, and the frame. The base we simply cut to size from a sheet of plywood (typically luaun). The squares themselves, since they are the face of the game board, we cut from a nicer quality oak plywood. To cut the squares, I cut thin strips of the plywood on my table saw. Then, I stack them 4 deep and cut them using a miter saw.
This picture shows one of my oak plywood strips on the miter saw with the jig i use for Seega and tafl board squares.
I usually just dedicate an hour or two a week to cut a lot of squares, and bag them in bags of 40.
Once I have the bases and the squares cut, we just carefully the glue the sqaures on. I usually have a little trim-work to do on the sides of the boards, but then I cut the board frames. For the Seega games, I cut simple unstained L-shape molding to size and then stain them. Once the stain dries, we glue the frame to the board.
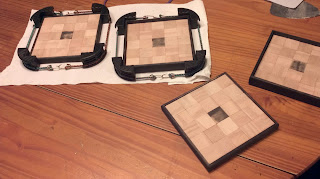
Here are four of the Seega boards, two have been glued and dried, two are still clamped and drying.
Once the glue dries, we stain the boards and the frames to bring out the texture. This batch we just stained a few hours ago with a dark walnut stain. I tried to get the light so you can see the wet stain. We put the first coat on for half an hour, the second coat for 15 minutes. After that, they get wiped down to dry for at least 8 hours. After that, they're pretty much finished.
Friday, July 29, 2011
Wood stained Senet Box
Not all the Senet boxes we've made have a color stain. This one is pine with a few coats of walnut Danish Oil. The black game squares are highlighted with a gold leaf border.


Sunday, July 10, 2011
Ebony Senet Board
We stained the box of this Senet board with an ebony stain. The papyrus plants around the base, at the ends of the game board, and the inner squares of the game squares, are all copper leafing.

Monday, March 14, 2011
Casting Senet Game Pieces
Finally got around to casting the game pieces for the Senet and Tjau games. We hand-carved and baked the original pieces out of modeling clay, then created a single mold for each piece. From these molds, we created five game pieces of each of style (2 different styles for each player, a simple cone and spool, and a more ornate set modeled after a bundle of reeds and a papyrus flower). Below are pictures of the sets we've made so far--really at this point we're just playing with colors. The bottom picture shows a five-piece mold for our cone-shaped game markers.
Labels:
20 Squares,
ancient Egypt,
ancient games,
board game,
boardgame,
boardgames,
Egypt,
Game Pieces,
molds,
Senet,
Tjau
Thursday, February 17, 2011
Senet Board with side drawer 2
Following up on the last post, here is our side-drawer game board fully assembled and treated with a medium-walnut Danish oil. I took my time putting this one together-- it was a lot of fun, but I think next time I'll do it a bit differently. Next step will be to apply the game squares (haven't yet decided if this will be a 30-Square Senet board or a 20 Square Tjau board) and the side panel paintings.
Subscribe to:
Posts (Atom)


